Contents
After flooding, addressing mold risk is critical for safety. You need to start by evaluating the extent of water damage to identify potential problem areas. Wearing protective gear during your inspection is non-negotiable, as it shields you from harmful spores. Knowing where mold is likely to thrive can save you time. But how do you ensure your inspection is thorough? Let’s explore the essential steps you should take next.
Key Takeaways
- Assess the extent of water damage by identifying the source and inspecting affected areas for signs of moisture and dampness.
- Wear protective gear, including a respirator and gloves, to ensure safety during the mold inspection process.
- Focus on high-risk areas like basements, bathrooms, and kitchens, where humidity and moisture can lead to mold growth.
- Utilize moisture meters for accurate readings, confirming calibration, and taking multiple readings in different locations.
- Document all findings meticulously, noting moisture levels, affected areas, and types of mold for effective remediation planning.
Assess the Extent of Water Damage
Before you begin your mold inspection, it’s crucial to evaluate the extent of water damage in your property.
Start by identifying the water source responsible for the damage—whether it’s a burst pipe, roof leak, or flooding. A thorough damage evaluation will help you understand the affected areas and prioritize your inspection efforts.
Examine walls, ceilings, and floors for signs of moisture, discoloration, or warping. Use a moisture meter to quantify dampness levels, as this will guide your next steps.
Don’t forget to check hidden spaces, like behind appliances or under carpets, where water can accumulate unnoticed.
Document your findings meticulously; this record will be helpful for remediation professionals later.
Wear Protective Gear During Inspection
When conducting a mold inspection, wearing protective gear is essential to safeguard your health. Mold spores can be harmful, so using proper safety equipment helps minimize exposure.
Start with a high-quality respirator designed to filter out mold particles; this is imperative for your respiratory protection. Next, wear protective clothing, such as coveralls, gloves, and goggles, to avoid direct contact with mold or contaminated materials. Be certain your gloves are durable and long enough to cover your wrists.
Additionally, consider using knee pads if you’ll be inspecting lower areas, as this can provide extra protection and comfort.
It’s crucial to ensure all your gear fits well to prevent any gaps where spores could enter. By prioritizing your safety with the right protective gear, you protect yourself and demonstrate professionalism and care in your mold inspection efforts.
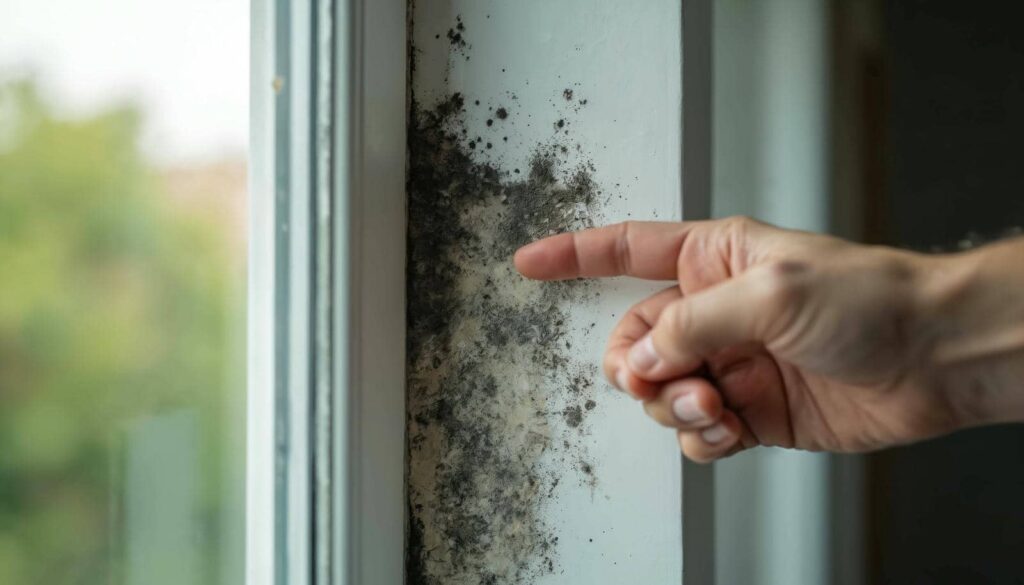
Identify High-Risk Areas for Mold Growth
Mold thrives in specific environments, making it essential to identify high-risk areas for growth during your inspection.
Understanding where to look can help you mitigate potential mold types and their growth conditions. Focus your attention on the following areas:
Basements and crawl spaces: These areas often remain damp, creating ideal growth conditions.
Bathrooms: High humidity and moisture levels provide a perfect breeding ground for mold types like Aspergillus and Cladosporium.
Kitchens: Spills and leaks can lead to moisture accumulation, fostering mold growth.
Roof leaks and window frames: Water intrusion from leaks promotes mold growth in both visible and hidden spaces.
Use Moisture Meters for Accurate Readings
To ensure accurate assessments of moisture levels, utilizing moisture meters during your mold inspection is essential. These devices help you detect hidden moisture that could foster mold growth.
There are two primary moisture meter types: pin-type and pinless. Pin-type meters penetrate materials to measure moisture content, while pinless meters use electromagnetic signals for non-invasive readings.
Before you begin, confirm that your moisture meter’s reading calibration is correctly set for the surfaces you’ll inspect. This step is significant, as inaccurate calibration can lead to misleading results.
Take multiple readings in different areas to get a thorough understanding of moisture distribution. Remember, relying solely on visual inspections may overlook important moisture sources.
Document Findings and Take Immediate Action
Documenting your findings during a mold inspection is essential for effective remediation. As you assess the situation, make certain to record observations meticulously.
This documentation helps you understand the extent of the mold growth and aids in communicating your findings to others involved in the remediation process.
To ensure a thorough approach, prioritize remediation by focusing on the following aspects:
- Identify and log affected areas to gauge severity.
- Note moisture levels and sources contributing to mold growth.
- Document the type of mold present, as some may require specific treatment.
- Create a timeline for remediation actions, ensuring timely intervention.
Frequently Asked Questions
How Long Does It Take for Mold to Grow After Flooding?
Mold can begin to grow within 24 to 48 hours under post-flood conditions. Understanding this mold growth timeline is essential for effective remediation and protecting your home from potential health hazards associated with mold exposure.
Can Mold Be Harmful to Pets After Flooding?
Oh sure, let your furry friend roll in mold! But seriously, mold toxicity can be harmful to pets after flooding. Safeguard their safety by promptly removing mold and monitoring any unusual behavior or health issues.
What Are the Signs of Hidden Mold Growth?
You’ll notice hidden mold growth through musty odors, discoloration on surfaces, and condensation. Utilize mold detection methods like air sampling and surface testing to identify common mold types, ensuring a safe environment for you and your pets.
Should I Hire a Professional for Mold Inspection?
Yes, hiring a professional for mold inspection is wise. Experts utilize advanced inspection methods to identify and address these issues, ensuring your space remains safe and healthy.
How Can I Prevent Mold After a Flood?
To prevent mold after a flood, use effective mold prevention methods like thorough drying, maintaining ventilation, and applying antimicrobial treatments during flood damage restoration. Act quickly, as timely measures greatly reduce mold growth risk.
Review
After flooding, you can’t afford to overlook mold inspection. By evaluating water damage, wearing protective gear, and pinpointing high-risk areas, you effectively safeguard your space. Using moisture meters gives you precise readings, ensuring no hidden threats linger. Coincidentally, as you document your findings, you’re not just preventing mold; you’re preserving your health and home. Taking immediate action sets you on the path to a safe, mold-free environment. Remember, vigilance today prevents future headaches tomorrow.
Recent Posts
3 Steps for Pipe Leak Cleanup
Could it be true that a fast response is the only thing standing between a
Why Remove Wastewater After Pipe Damage
When a pipe fails, do you really want wastewater left to spread? You need to
How to Clean Up Pipe Water Damage
If a pipe bursts under your kitchen sink at midnight, you need to act fast: